Terraria How to Get Slime Statue Easy
There are many rare drops from enemies that are vital to progression. Farming for some of these items can take a long time, but there are many different methods that can make it a significantly simpler task.
Basics
An essential part of enemy farming is knowing the basics of NPC spawning.
- Hostile and friendly NPCs can only spawn in a 168x94 tiles area around the player, and there is a limit to how many enemies can exist in an area at the same time.
- Spawn rates are different depending on the Biome, depth, Weather and the time of day. These factors also change what type of enemies spawn, so you will need to pick the right location and time.
- Various special events can increase the spawn rate and limits. Additionally, they offer their own list of enemies. Most of these events can be manually summoned by the player with an appropriate item. The Blood Moon warrants special mention, as it increases the universal spawn limit, meaning that it increases spawn rates anywhere in the world.
- Enemy spawns are suppressed near friendly NPCs, including not only the "town" NPCs, but the Traveling Merchant and the Skeleton Merchant. If there are three friendly NPCs on screen, no enemies will spawn. Friendly NPC presence does not affect spawning during events such as the Blood Moon or invasions.
- Use of a Water Candle and/or a Battle Potion will increase spawn rates. Contrarily, a Peace Candle, Calming Potion, and Sunflower will reduce spawn rates. Invasions are not affected by these items, but Blood Moons and Solar Eclipses are.
- Many biomes can be artificially created by placing blocks pertaining to that biome. This allows the player to farm biome-exclusive enemies and their drops in a single convenient location.
It's also important to know the limits on dropped items: while they do not expire, there is a worldwide limit of 400 such items that can exist at once. If more items are dropped into the world, the oldest item will despawn. This becomes particularly important when large numbers of enemies are being killed and dropping items.
Methods
Farming Area
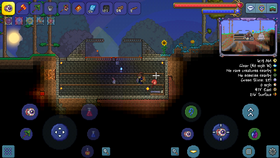
The basic idea of farming enemies is to find or build an area where they can be easily gathered and killed in one place. When looking for a good place for farming, wide and open areas are preferred. Examples include a large section of a Cavern, or a big room in the Dungeon. Once found, the location can then be modified further to improve its efficiency and reduce the enemies that spawn outside of it, for which Explosives and Mining Potions can help. A farm can also be built from scratch, which can be remarkably efficient once the initial time and effort are put in.
Any monster farm should also include a safe zone which is protected from enemies, allowing the player to recover health and make use of weapons that can attack through walls. While Doors prevent most enemies from coming in, some can also break them down or simply phase through them.
The farm can be improved with Campfires, Heart Lanterns, and Honey to increase health regeneration, and Water Candles increase enemy spawns. A Star in a Bottle (or few) will help with mana recovery.
One thing that makes mob farm making so hard is that you almost always have to fight enemies when making the farm.
-
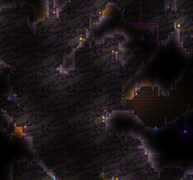
A wide section of a Cave like this...
-
... can be turned into a good Farming spot.
-

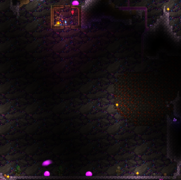
A 168x47 tiles area made for farming Caverns enemies. Every tile of 47 tiles below the flat surface is covered with player made walls, in order to focus all spawns in this area.
The farming process itself can be automated with Minions or other methods.
Lava Pits
The simplest way to keep most enemies contained is with a pit filled with Lava. It can deal effectively with most basic grounded enemies, as well as some flying ones, however it is ineffective against Casters and those that can phase through blocks. A common design is the "Volcano farm": a Lava Pit between two ramps, made with hammered Blocks. When the player is standing below the pit, enemies that spawn will climb up the slopes and fall into the lava pit. The pit should be at least 8 blocks deep so grounded enemies cannot jump out. Note that flying enemies will usually avoid the Lava (if the player is underneath the lava pit, that can lead some flyers to their death), but they can still be killed by other methods, such as Minions or Traps. Many enemies also lack the ability to drop down from Platforms, which can be exploited to effectively trap them in a certain part of the farm.
Lava Depth
This content is transcluded from Lava § Lava Depth.Lava will destroy any item of White rarity (Other than the aforementioned exceptions) including Coins, if it is deep enough for the item to sink past its midpoint. (That is, items with larger sprites can survive deeper lava.) This allows making pits with lava just deep enough to burn copper coins, but (almost) nothing else:
- If too many items (over 400) accumulate in the world, the oldest ones will despawn.
- Copper coins are among the least valuable objects in the game, but each stack of them still counts as an item. An event or enemy farm can produce huge numbers of copper coins, so it's worth discarding them, against the risk of despawning more valuable items. Fortunately they are also among the smallest items in the game (with a sprite only 12 pixels high).
- A notable exception: The far more valuable Lihzahrd Power Cell also has a 12 pixel high sprite, and will be destroyed with the copper coins.
- Other notable heights: Silver coins and gel share a 14-pixel height, while block items are 16 pixels tall.
- To check if a lava moat has the exact depth required, a player can throw in one copper coin, then one silver coin. The copper coin should burn, but the slightly taller silver coin should not.
- In practice, this lava depth can be achieved with 1 Bucket of lava for each 6 to 8 tiles of pit length.
- Thus a moat that is 6-8 blocks wide, should have one bucket thrown in, while a moat of 12-16 should have 2.
- This implies avoiding lengths where this range can't be achieved: 1-5, 9-11, 17. A moat 18 or more tiles long can always be filled to proper depth.
- When filling a very large moat, it is best to drop individual lava buckets over the width of the moat, and not throw it on the same spot, due to unreliable liquid physics.
Mechanisms
Once the Mechanic has been rescued, Dart Traps and their improved variants, Geysers or Flame Traps, Spear Traps, or Spiky Ball Traps can all be used to speed up farming.
Actuators can also be used to make safer entrances and to improve Lava Pits; covering them with a layer of actuated Blocks makes it so they can be activated only when in use. Once the Steampunker has arrived to the world, the player can buy Teleporters to create instant and safe entrances and Conveyor Belts to more easily collect the loot from enemies.
Enemies to Farm
Often a desired item can only be obtained from particular enemies, especially in Hardmode. These items can be very useful for game progression, but some of them can be harder to farm than others.
In some cases a statue farm can be useful; see below for details of statue farming. The question there is whether there is a statue to produce the desired item. This can also produce items for sale, see below.
In a few cases (coins, souls, biome keys, some yoyos) any enemy in a given biome can produce the target item (but perhaps rarely), so a farm can be set up in the appropriate area, or an artificial biome can be created somewhere convenient; then the farm can be set up to produce an easily killed enemy type, or (more likely) to slaughter all comers. Unfortunately, none of these universal drops are produced by statue-spawned enemies.
Most often, it is necessary to choose a location (biome and height) where the desired enemy spawns; the problem is that if unwanted enemies are just ignored, they will fill the spawn limit and block out the targets you're especially looking for. In a few cases, the "chaff" enemies are weaker or behave differently so that they can be slaughtered more easily; or they may be exceptions that the player can target while the targets are killed automatically. For example, a trap setup might send ground-based enemies into a lava pit while the player hunts fliers and/or fights the few enemies strong enough to survive the lava. Conversely, traps can take out flying enemies, while the player handles the walkers.
Pre-Hardmode
- While slimes are commonplace, farming them specifically can get multiple Pinkies for Pink Gel, which can be used to craft Peace Candles. Use of a statue to farm slimes won't get Pinkies, but can eventually yield the Slime Staff.
- During a Blood Moon, Blood Zombies and Dripplers drop the Shark Tooth Necklace and Money Trough, both being very useful items. (Both enemies can be farmed with statues, see below.)
- After obtaining all of the important Blood Moon loots (such as Money Trough, Shark Tooth Necklace, Bloody Tear, and Blood Moon fishing loots), an effective way to spend additional Blood Moons is Surface Corruption/Crimson enemy farming. Due to the greatly enhanced Surface spawn rate, you can obtain a large amount of Rotten Chunks/Vertebras, which are used to craft Boss-summoning items, namely Worm Food(Eater of Worlds)/Bloody Spine(Brain of Cthulhu) and Mechanical Worm(The Destroyer, in Hardmode). Note that repeatedly killing Eater of Worlds/Brain of Cthulhu and selling Demonite/Crimtane ores is one of the best ways to make money pre-Hardmode. Rotten Chunks/Vertebras can also be used to craft Battle Potion for more efficient enemy farming later on.
- This is also a good time to collect Black Lenses from Demon Eyes if you haven't stashed some already. These will be needed to make an Optic Staff.
- Dungeon: Angry Bones in the Dungeon drop the Clothier Voodoo Doll, which can be used to summon Skeletron again. A variety of enemies can drop a Tally Counter to complete your Cell Phone. Cursed Skulls drop the Nazar, which (besides being useful on the spot) will be needed later for your Ankh Shield.
- Underworld: Demons drop the Demon Scythe (a particularly powerful magic weapon for its stage), and its Voodoo variant drops the Guide Voodoo Doll (used to summon the Wall of Flesh). The player may want to kill the boss multiple times due to the very useful items it drops, so collecting the dolls in Pre-Hardmode is useful. However, if a Voodoo Demon drops its Voodoo Doll in Lava, the Wall of Flesh will be summoned, so it is better to cover all nearby Lava lakes before farming. If a Hellbridge has been built for the Wall of Flesh, it can be used as a farm area.
- In 1.4.0.1, it is recommended to farm large amounts of Eaters of Souls, as they have a rare chance to drop Ancient Shadow armor, the second best melee armor Pre-Hardmode, only surpassed by Molten armor, which can only be obtained after beating at least some segments of the Eater of Worlds or some Creepers summoned by the Brain of Cthulhu.
Hardmode
- Enemies in several different biomes (Jungle, Snow, Desert, Hallowed, and Corruption or Crimson) can drop Biome Keys. Since any enemy can drop them, these are a good target for farms in the respective biomes at any height.
- Likewise Souls of Night and Light are required for many early Hardmode recipes. They can only be obtained from enemies in the underground Corruption/Crimson and Hallow, respectively, but any variation of the infected biome will do.
- If you previously made a Hell Bridge with corruptible blocks, you could use converted blocks to farm Underworld enemies for souls. This makes farming easier, as Hardmode enemies don't spawn until a Mechanical Boss is defeated.
- Alternatively, you can kill Underworld enemies while standing on the area directly under The Corruption/Crimson or The Hallow and they will drop their corresponding Soul of Night and Soul of Light.
- Spawn King Slime in the Underground Hallow, Corruption, or Crimson. As Blue Slimes are common enemies, they can drop souls when killed. (This no longer works as of 1.4)
- Ichor and Cursed Flames are obtained from certain enemies in the Underground Crimson or Corruption respectively. They are used for multiple Ammo types.
- Unicorns and Pixies from the surface Hallow can be easily farmed and drop useful crafting materials that can also be sold for a decent amount, such as Pixie Dust and Unicorn Horns. (See example farm below)
- Solar Eclipses spawn many enemies, most of them having distinctive drops:
- Creatures from the Deep will drop the Neptune's Shell.
- Vampires can drop the Moon Stone and Broken Bat Wing when killed.
- Reapers can drop the Death Sickle.
- Mothron can drop Broken Hero Swords and, once Plantera has been defeated, drops its Wings and The Eye of Cthulhu yoyo.
- One of the Oceans can be easily turned into an Artificial Jungle biome, with the use of Jungle Grass Seeds on Mud Blocks or Lihzahrd Bricks. (See example below.) This will cause Arapaimas to spawn in the water at a very high rate. When the player stands on a puddle of water built above the Ocean, the Arapaimas will try to attack them, but be unable to do so and instead be stuck just below them, where they can be automatically killed by Minions, Traps and Lava. As of 1.4 this will no longer occur through solid blocks. Using bubbles and platforms will still work, but is less safe.
- Enemy farms have been buffed as of update 1.4, as some enemies drop a lot of gold. Staying AFK for a long time can even give hundreds of platinum coins.
Some more specific targets to focus on:
- At the beginning of Hardmode, Mimics found underground (including in the Underworld) can be farmed to obtain a large amount of money and very useful drops. The Lifeform Analyzer and Hunter Potions greatly help when looking for them. Later, the Golem Room is an excellent place for farming Mimics.
- The Wyvern miniboss provides Souls of Flight used for Wings. It only spawns in Space, which can often be reached by a Floating Island. Like many Worm type enemies, it is very vulnerable to piercing weapons.
- Skeleton Archers drop the Magic Quiver, which increases Arrow damage by 10%, and the Marrow Bow.
- Many enemies have a small chance to drop various components for the Ankh Shield (see Guide:Crafting an Ankh Shield).
- Chaos Elementals are found in the Hallow Caverns. They will very rarely drop the Rod of Discord used to teleport. They have some useful traits for farming them:
- They spawn only on Pearlstone and Pearlsand. (A Crystal farm can double for spawning Chaos Elementals in quantity.)
- They can only teleport to the ground, and cannot appear on top of a player.
- They will not spawn if the player is standing in front of player-placed background walls.
- In 1.4, they will not spawn unless the player has recently moved or jumped. To farm them while AFK, the player can use the Frog Leg or Slimy Saddle to automatically jump indefinitely.
- The Uzi and Turtle Shells can be obtained from Angry Trappers and Giant Tortoises respectively. Due to the nature of the Hardmode Jungle, these items are hard to obtain before killing a Mechanical Boss.
- The Ice Sickle is dropped by many enemies in the Ice biome. Additionally, the Frozen Turtle Shell can be obtained from Ice Tortoises.
Post-Plantera
Plantera's death unleashes many new enemies, each with their drops:
- In the Dungeon:
- Shadowbeam Staff, Inferno Fork and Spectre Staff from Necromancers, Diabolists and Ragged Casters respectively.
- The Paladin will drop its Hammer and/or Shield when killed.
- Bone Lee will drop the Tabi or Black Belt.
- All variants of Armored Bones can drop the Magnet Sphere and Keybrand.
- Skeleton Commandos, Tactical Skeletons and Skeleton Snipers can drop their Rocket Launcher, Tactical Shotgun or Sniper Rifle respectively.
- All enemies with greater than 100 health points have a chance to spawn a Dungeon Spirit when killed, which will drop Ectoplasm used for many recipes.
- Farming these enemies is harder with common methods due to many enemies having the ability to attack through blocks.
- During the Solar Eclipse:
- Butchers can drop their Chainsaw.
- Deadly Spheres can drop the Deadly Sphere Staff.
- Dr. Man Flies can drop the Toxic Flask.
- Nailheads can drop the Nail Gun.
- Psychos rarely drop their Knife.
- In the Jungle Temple, Lihzahrds and Flying Snakes can drop Solar Tablet Fragments and Lihzahrd Power Cells.
- Traps looted from the Temple can be very useful for building more effective farms to deal with advanced enemies.
- Once the Golem has been defeated, his room is an excellent place to farm Mimics.
- From the Martian Madness event, the Martian Saucer and Scutlix Gunners can drop unique weapons and mounts.
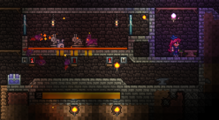
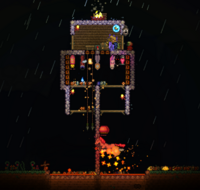
Statue Farms
A multi-target statue farm.
Statue farms can be used in order to easily obtain special items from a particular enemies, or to gather large numbers of items for sale or supply. They have the advantage of being able to choose a particular enemy to farm.
The basic setup for statue farming involves connecting one or more statues to a 1/4 second timer (or a Crab Engine). Place a shallow layer of lava (recommended) around the statue, and/or connect a few Dart Traps to kill the spawned monsters. Once you click the switch, all you have to do is wait for drops to accumulate. A tunnel beneath the trap can allow safe collection. Housing a vendor NPC near the farm is convenient for selling the items quickly. Multiple statues in a lava pit can speed things up.
However, there are limits to statue farming:
- Statue-spawned enemies do not drop coins and many have reduced drops. An already-rare drop with reduced chances can require considerable amount of time to farm.
- Some statue-spawned enemies will not drop items at all if they are killed by traps. Using a lava-based setup will avoid this limit entirely.
- If a statue for a Hardmode enemy is used before Hardmode, it either will not spawn or will not drop loot.
- Statue-spawned critters cannot be captured. Critters converted to evil forms by a Blood Moon will not drop coins, but can drop other items.
- A farm can make use of up to three statues; for most enemies a single timer will do, but for the weakest enemies (those killed in less than a second by lava) staggered timers may improve speed slightly.
-

A statue farm with three statue spots and staggered timers. The drain chamber for the lava allows swapping in different statues. The torches at the bottom indicate the Teal Pressure Pads. The anvil is for crafting Chains and Grappling Hooks.
-
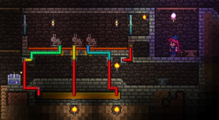
Same statue farm showing the wires. The left switch triggers one timer and a dart trap, which triggers the other two timers via Teal Pressure Pads.
-
The statue farm in action during a Blood Moon. 15 or so Bunny Hoods far outearn the rest of the event in pre-Hardmode.
List of Spawner Statues
This content is transcluded from Statues.
| Statue | Enemy | Factor[1] | Notes |
|---|---|---|---|
| Internal Item ID: 3719 | | 0.2 n/a |
|
| Internal Item ID: 443 | | 0.2 n/a |
|
| Internal Item ID: 3720 | | 0.05 |
|
| Internal Item ID: 3712 | | 0.2 |
|
| Internal Item ID: 463 | | 0 |
|
| Internal Item ID: 466 | | 0.05 |
|
| Internal Item ID: 454 | | n/a |
|
| Internal Item ID: 3710 | | 0.05 |
|
| Internal Item ID: 471 | | 0.05 |
|
| Internal Item ID: 441 | | 0.01 |
|
| Internal Item ID: 3718 | | 0.2 n/a |
|
| Internal Item ID: 3715 |  Harpy Harpy | 0.05 |
|
| Internal Item ID: 3717 | | 0.05 n/a |
|
| Internal Item ID: 452 | | 0.05 |
|
| Internal Item ID: 449 | | 0.05 |
|
| Internal Item ID: 459 | | 0.2 n/a |
|
| Internal Item ID: 3714 | | 0.05 |
|
| Internal Item ID: 3716 |  Pigron (Any) Pigron (Any) | 0.05 |
|
| Internal Item ID: 478 | | 0.2 n/a |
|
| Internal Item ID: 2672 | | 0.2 n/a |
|
| Internal Item ID: 446 | | 0.2 n/a |
|
| Internal Item ID: 440 | | n/a |
|
| Internal Item ID: 3713 | | 0.25 |
|
| Internal Item ID: 3709 |  Unicorn Unicorn | 0.05 |
|
| Internal Item ID: 3708 |  Wall Creeper Wall Creeper | n/a |
|
| Internal Item ID: 3711 | | 0.05 |
|
Examples
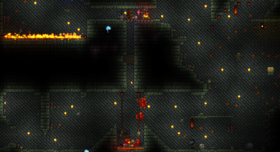
-
A Volcano farm is very efficient when farming Giant Tortoises.
-
With some Traps and Lava, it's very simple to turn a section of the Dungeon into a Farming area.
-

Many Event enemies cannot go through blocks.
-
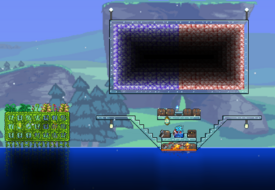
An Ocean Farm in action. Notice the Crimson and Corruption Blocks used to make the Arapaimas drop Corruption and Crimson Keys. While this specific farm is mainly used for Biome Keys, it can also be an effective Money farm.
-
An example of a surface farm built in the Hallow.
-

A basic "Volcano Farm" made for Underground enemies.
-
A simple Pre-Hardmode farm. Can be used AFK, a reliable way to protect the player from Blood Moons and making money. Do note the inaccessible loot on the ramps.
-
A advanced AFK/Semi-AFK farm Hardmode farm. Do note the presence of Conveyor belts, for collection of loot, and a bed in case of death.
- ↑ Drop chance reduction factor. The actual item drop chance can be calculated via multiplying the original chance by this factor. If there is no factor, then the drop chance is unchanged. Information taken from the
 Desktop 1.4.3.6 source code, field
 StatueSpawnedDropRaritySetsTerraria.ID.NPCID.cs
Source: https://terraria.wiki.gg/wiki/Guide:Enemy_farming
Post a Comment for "Terraria How to Get Slime Statue Easy"